
Water supply in India is unpredictable. Whether you live in a Mumbai high-rise, a Pune independent bungalow, or a new township in Thane, most homes rely on water tanks to bridge the gap between municipal supply hours and daily need. Yet for something so essential, water tank installation gets surprisingly little attention during the design and construction phase.
At Maksideo Design Consultants, we have seen firsthand how a poorly sized or badly placed water tank creates problems — low pressure at taps, leaking overhead structures, contaminated water, and expensive retrofits. So, here is a practical, no-fluff guide covering the key water tank installation tips for Indian homes: how to size your tank correctly, where to place it, and which material actually suits your situation.
Outline
- Why Water Tank Planning Deserves More Attention
- How to Size Your Water Tank Correctly
- Overhead Tank vs Underground Sump: Which Do You Need?
- Best Water Tank Materials for Indian Homes
- Key Water Tank Placement Tips for Indian Homes
- Maintenance Tips to Extend Tank Life
- Conclusion
Why Water Tank Planning Deserves More Attention
Most people pick a water tank the same way they pick an air cooler — walk into the nearest hardware store, ask for a 1,000-litre tank, and call it done. That approach works until it does not. A tank that is too small runs dry during supply cuts. A tank that is too large sits stagnant for days, which encourages bacterial growth. And a tank that sits on a poorly designed platform becomes a structural risk over time.
Furthermore, the placement of your water tank directly affects water pressure across your home. In India, gravity-fed systems are still the norm in most low-rise and mid-rise buildings. So, the height at which your overhead tank sits determines whether your shower has decent pressure or trickles like a leaking tap.
Getting the tank sizing, placement, and material right at the design stage avoids all of these problems. And since you are reading this before construction or renovation — that is exactly the right time to think it through.
How to Size Your Water Tank Correctly
The Basic Formula
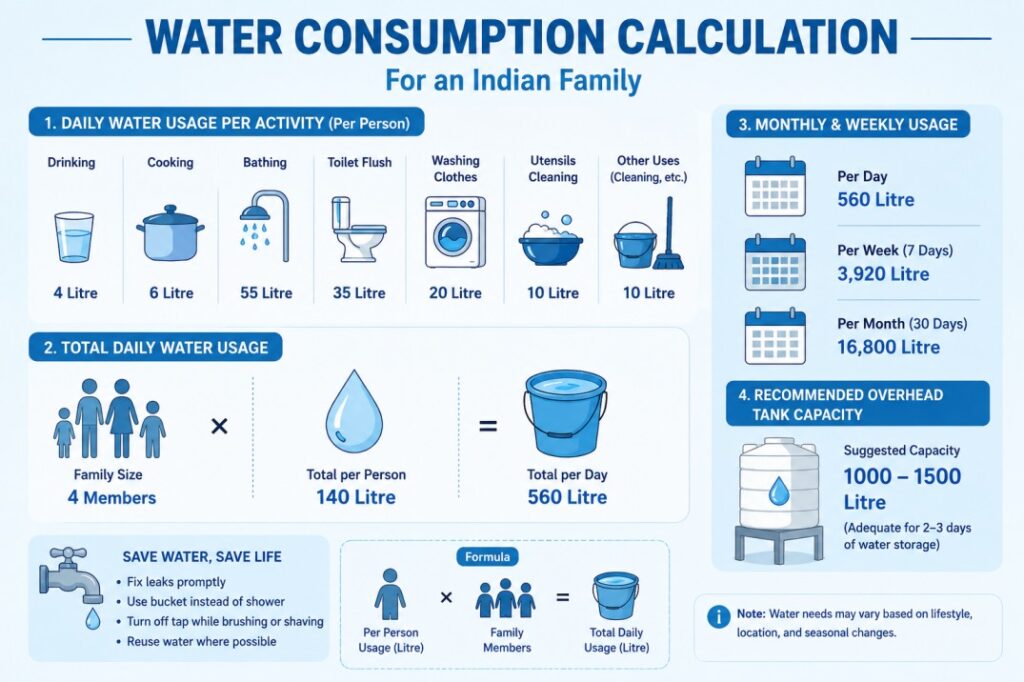
The rule of thumb used across India is 135 litres per person per day for residential use. This is the standard set by the National Building Code of India and it covers drinking, cooking, bathing, sanitation, and cleaning combined.
To calculate your tank size, simply multiply the number of people in your home by 135 litres, and then factor in how many days of storage you want as a buffer.
- A family of 4 needs approximately 540 litres per day.
- For 2 days of buffer storage — which is standard in most Indian cities — that comes to 1,080 litres.
- For areas with less reliable supply, like peri-urban zones or older municipal networks, a 3-day buffer is safer: roughly 1,620 litres for a family of 4.
Sizing for Different Home Types
Beyond headcount, the type of home also influences how you split storage between an underground sump and an overhead tank:
- 1BHK or studio apartment (2–3 people): A 500-litre overhead tank is typically adequate if the building has a common sump. If not, add a 1,000-litre underground sump.
- 2BHK (3–4 people): A 750-litre to 1,000-litre overhead tank paired with a 2,000-litre underground sump covers most scenarios comfortably.
- 3BHK or larger (4–6 people): Plan for a 1,500-litre overhead tank and at least a 3,000-litre sump. If you have a terrace garden or a car wash connection, add 500 litres to your estimate.
- Independent bungalows or villas: Size upward significantly — a 5,000-litre sump combined with a 2,000-litre overhead tank is a reasonable starting point for a 4–6 member family.
Also, remember that a full overhead tank is heavy. A 1,000-litre tank weighs roughly 1,000 kg when full. Therefore, the RCC platform and the supporting structure need to be designed to carry that load safely. This is a structural decision, not just a plumbing one.
Overhead Tank vs Underground Sump: Which Do You Need?
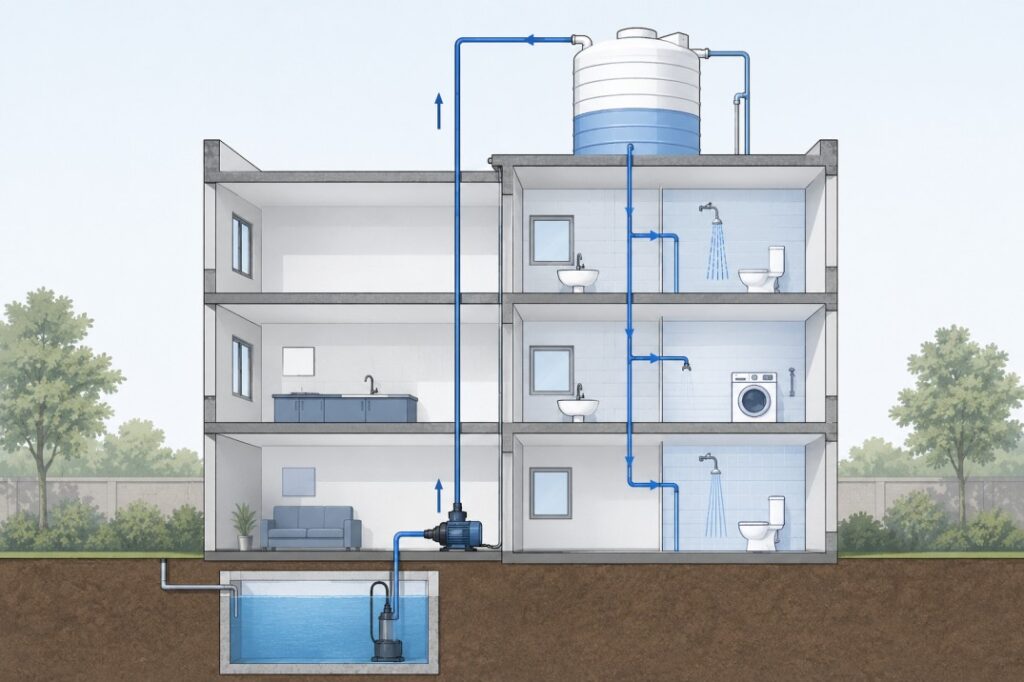
Most well-designed Indian homes use both — and for good reason. Here is how each one works and what role it plays:
Underground Sump (Storage Tank)
An underground sump collects water directly from the municipal supply line or borewell. Since it sits below ground, it does not depend on structural support above the building. Sumps are generally much larger in capacity and serve as the primary water reserve.
- Best location: Below the driveway, garden, or service area — never directly under a habitable room, as leaks are difficult to detect and repair.
- Minimum depth from top of slab: At least 150 mm of cover over the tank lid for protection and to prevent contamination.
- Connection: A submersible pump pulls water from the sump and pushes it up to the overhead tank on a timer or via a float valve system.
Overhead Tank
The overhead tank feeds your home through gravity. Water flows down from the rooftop tank through pipes to every fixture in the house. The height difference between the tank outlet and your fixtures creates the pressure.
- Minimum height above highest fixture: The bottom of the overhead tank should sit at least 2 metres above the highest point of use — typically the shower head on the top floor. Each additional metre of height adds roughly 0.1 bar of pressure.
- For a standard 3-storey home: Place the tank on a dedicated RCC platform on the terrace, elevated 1.5 to 2 metres above the terrace slab.
- Tip: If you install a booster pump for your bathrooms, the overhead tank height matters less. However, the tank still needs to be above the highest water usage point for gravity flow to work as a backup when power is out.
Best Water Tank Materials for Indian Homes

Material choice is where most people either overspend without reason or underspend and regret it. Here is a clear breakdown of the most common water tank materials used in Indian residential construction:
Polyethylene (PE / LLDPE) Plastic Tanks
By far the most popular choice for overhead tanks in India. Brands like Sintex, Ashirvad, and Supreme dominate this segment. These tanks are lightweight, UV-stabilised, non-corrosive, and available in sizes from 200 litres to 10,000 litres.
- Pros: Affordable, easy to install, no rusting, available everywhere, ISI-marked options are food-grade safe.
- Cons: Can develop algae over time if not cleaned regularly. Cheaper non-ISI variants degrade faster under UV exposure and may leach plasticisers into the water.
- Best for: Overhead tanks in most residential applications. Always choose triple-layer or four-layer tanks for better insulation and UV resistance.
Stainless Steel Tanks
Stainless steel tanks — especially those made from food-grade SS 304 — are an excellent choice for homes where water quality is a priority. They are hygienic, durable, and do not support algae growth.
- Pros: Long service life (20+ years), no odour or taste imparted to water, easy to clean, suitable for hot water storage.
- Cons: Higher upfront cost compared to plastic. Also heavier, which means the supporting structure needs to be stronger.
- Best for: Homes with elderly residents or young children where water purity is critical. Also suitable for underground sumps where aesthetics do not matter but hygiene does.
RCC (Reinforced Cement Concrete) Tanks
RCC tanks are built-in-place structures — either as underground sumps or terrace-level storage. They are commonly used in bungalows, independent houses, and larger residential projects.
- Pros: Very high capacity, long-lasting, and structurally integrated with the building. No replacement needed.
- Cons: Requires proper waterproofing — both internal and external — or the tank will crack and seep over time. Internal waterproofing with food-grade coating is essential.
- Best for: Underground sumps and large-capacity storage in independent homes and villas. Not ideal for overhead tanks due to weight.
FRP (Fibre-Reinforced Plastic) Tanks
FRP tanks are less common but worth knowing about, especially for larger capacities above 5,000 litres. They are lighter than RCC and more durable than standard plastic.
- Pros: Lightweight for their capacity, corrosion-resistant, and structurally stronger than regular polyethylene tanks.
- Cons: Harder to find locally, higher cost, and repairs are more complex if the tank is damaged.
- Best for: Large overhead or terrace tanks in mid-rise buildings where structural load is a concern.
Key Water Tank Placement Tips for Indian Homes
Beyond the overhead versus underground decision, placement within your site and building matters a lot. Here are the most important water tank installation tips to follow:
- Keep the overhead tank away from the edge of the terrace: Structural loads need to be distributed through the building’s columns, not the parapet walls. Position the tank over or close to a column grid whenever possible.
- Avoid placing the sump near septic tanks or drainage lines: Keep a minimum horizontal separation of 3 metres between your underground sump and any sewage line or septic tank. Proximity increases contamination risk, especially in older neighbourhoods with leaking drainage.
- Face the tank inlet and outlet correctly: The inlet from the pump should enter near the top of the tank. The outlet to the supply line should draw from slightly above the tank base — not the very bottom — to avoid sediment entering the pipes.
- Install an overflow pipe: Every water tank needs an overflow connection at a safe discharge point. Without it, overfilling spills water into the building or onto the terrace, which causes seepage over time.
- Shade your overhead tank: In Mumbai’s climate, a water tank baking in direct sun all day heats up significantly. Not only does warm water feel unpleasant, it also encourages bacterial growth. A simple shade structure or a four-layer insulated tank solves this.
- Use gate valves, not stop cocks, at key junctions: Gate valves last longer and are easier to operate under pressure. Install them at the inlet, outlet, and overflow connections for easy maintenance access.
Maintenance Tips to Extend Tank Life
Even the best tank installation needs periodic upkeep. Follow these simple steps to keep your water storage clean and functional:
- Clean your overhead tank at least once a year: Drain it completely, scrub the interior walls with a soft brush and a mild chlorine solution, rinse thoroughly, and refill. This removes sediment, algae, and biofilm.
- Check the inlet float valve every 6 months: A faulty float valve either overfills the tank or cuts off the pump too early. Both waste water and strain the pump motor.
- Inspect the RCC sump for cracks every 2–3 years: Even well-built concrete sumps develop hairline cracks over time. Catch them early and apply a food-grade waterproofing compound before they widen.
- Keep the tank lid tightly covered: An open or cracked lid is an entry point for insects, dust, and birds. Replace damaged lids promptly.
- Test your water quality annually: If your building is older or if you source water from a borewell, get the water tested for TDS, hardness, and bacterial contamination at least once a year.
Conclusion
Water tank installation is one of those decisions that sits in the background — invisible once the plaster is on and the tiles are laid. But it shapes how comfortable your home is every single day. The right tank size means you never run dry. The right placement means good pressure at every tap. The right material means clean water for years without unexpected repairs.
Whether you are building a new home, renovating an older one, or simply upgrading an undersized tank, these water tank installation tips for India give you a solid foundation to make the right call. Take time to plan it with your architect, structural engineer, and plumbing contractor together — rather than treating it as an afterthought.
At Maksideo Design Consultants, we coordinate every detail of residential and commercial design — including the systems that make a home genuinely comfortable to live in. If you are at the planning stage and want expert guidance on your water storage layout, reach out to our team. We are happy to help you get it right from the start.